

How Do I Repair A Pencil Style Die Grinder
1 / 15
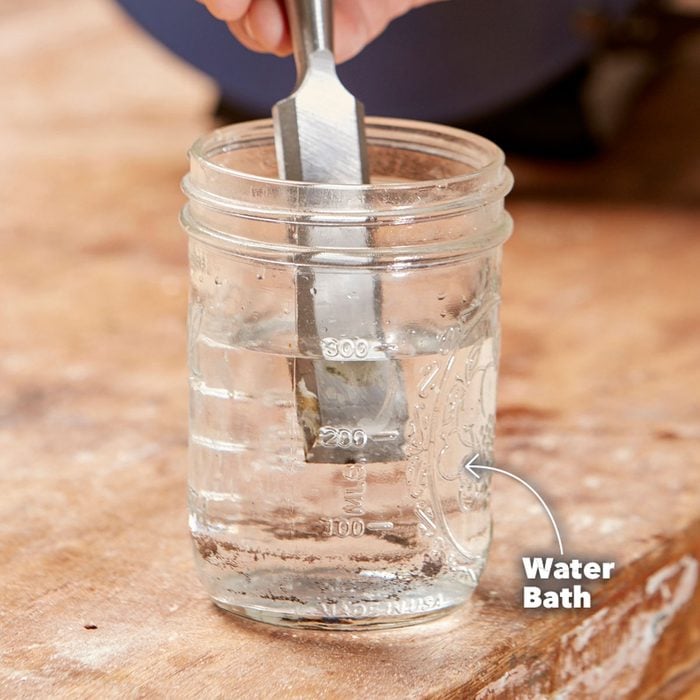
Keep a Container of Water Handy
Well-nigh chisels and other cutting tools are made of tempered steel. If the steel gets also hot and turns blueish black, information technology's overheated and won't concur an edge very long. To avoid ruining the border of a tool by overheating, keep water nearby to absurd the tool. A good technique is to move the tool once across the bench grinder for no more than a few seconds. So dip it in the h2o. If the steel border does overheat and turns colour, grind the edge back to good steel and commencement over.
two / 15
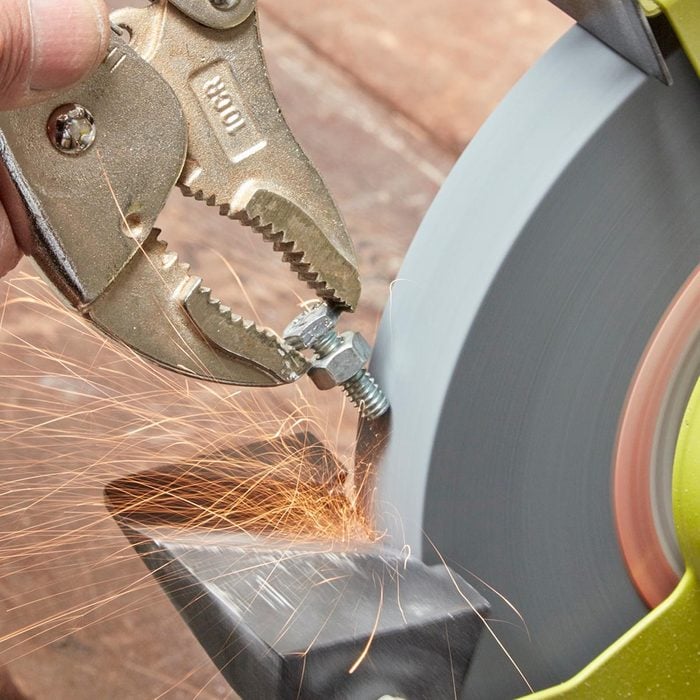
Grind Small-scale Objects Safely
Agree small objects with locking pliers. This keeps your fingers a safety distance from the grinding wheel and protects them against burns from the hot metal. It also gives you lot better control over the grinding process. Cheque out how to sharpen tools.
3 / fifteen
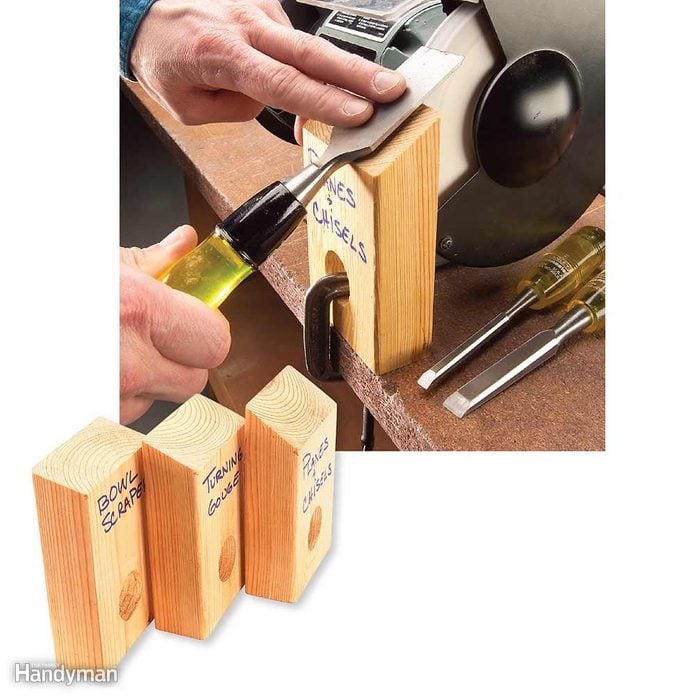
Make Tool Sharpening Guides
Here'south a better mode to hold tools deeply while yous're grinding them—and take the guesswork out of creating the right bevel bending. It's a brusque piece of 2×4 with an angled terminate and a 1-ane/4-in. pigsty for a clench. I made 1 for chisels and plane blades, and a few more with unlike angles for woods-turning tools. Large labels with the tool's name tell you which blocks are for which tools. For a Delta grinder with a 6-in.-diameter wheel, a 5-1/2-in.-long slice of two×iv aligns the tool to the cycle just right. For other bench grinders, you may need to conform this length. Note: The bending you cut on the block is non the same equally the tool's bevel bending. But allow'southward skip the math. To make up one's mind the block angle, plough off the grinder and concord the tool's bevel flush against the wheel. The bending of the tool shaft to the workbench is the angle to cutting on the ii×4. Our cheers to Ray Caputo for this sharp accessory.
four / xv
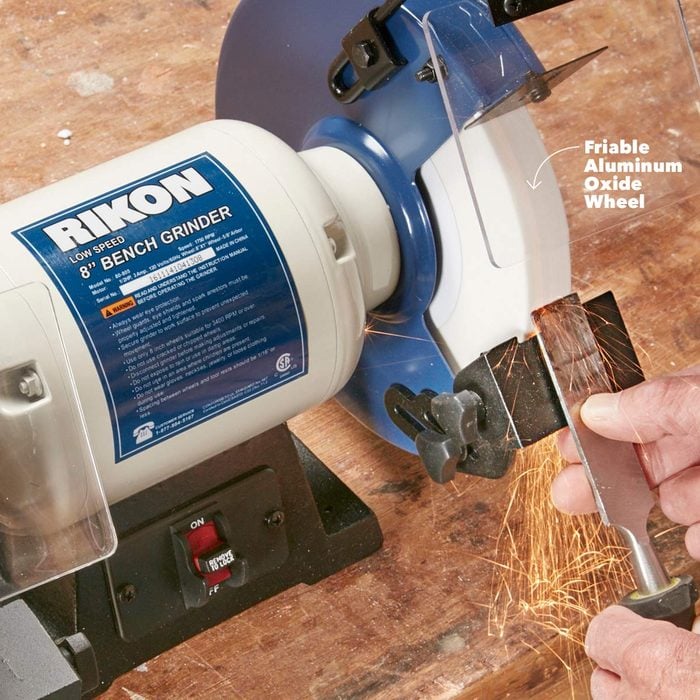
Consider a Low-Speed Grinder for Sharpening
Unless they're variable speed, most bench grinders run at virtually iii,450 rpm. If you're conscientious and go along the cycle dressed (more on that in another tip), these high-speed grinders piece of work fine. But for sharpening, a depression-speed grinder running at one,750 rpm is a better pick. The lower speed reduces the chance y'all'll overheat the edge of your tool. Another reward of a low-speed grinder ($100 to $150) is that this type typically includes friable white grinder wheels, which do a better job of sharpening than the gray grinder wheels usually included with loftier-speed grinders. See how to use an bending grinder.
v / 15

Clothes Wheels Frequently
Wheel dressing squares the face of the bicycle, but more than important, it exposes new grit for more than efficient cutting. Every bit a wheel is used, the spaces between the cutting grit can go clogged, and the grit itself dulled. A wheel in this condition can cause overheating and slows material removal. A wheel dresser like the one shown here ($15 to $30) has a bar with diamond grit impregnated in it. Holding the bar against the spinning wheel cuts away the surface to expose new dust, squares the face up of the wheel and rounds the wheel. To apply a dressing tool similar this, start the bench grinder and look for it to achieve full speed. Then printing the diamond wheel dresser against the spinning bike, holding information technology perpendicular to the confront of the wheel. Be sure to article of clothing a good-quality dust mask. The fine aluminum oxide dust is very bad for your lungs. Draw a pencil line on the wheel before you get-go to help you gauge when y'all've removed enough textile from the cycle. Dress the wheel simply until the pencil line disappears. Check out these clever new uses for tools.
6 / 15
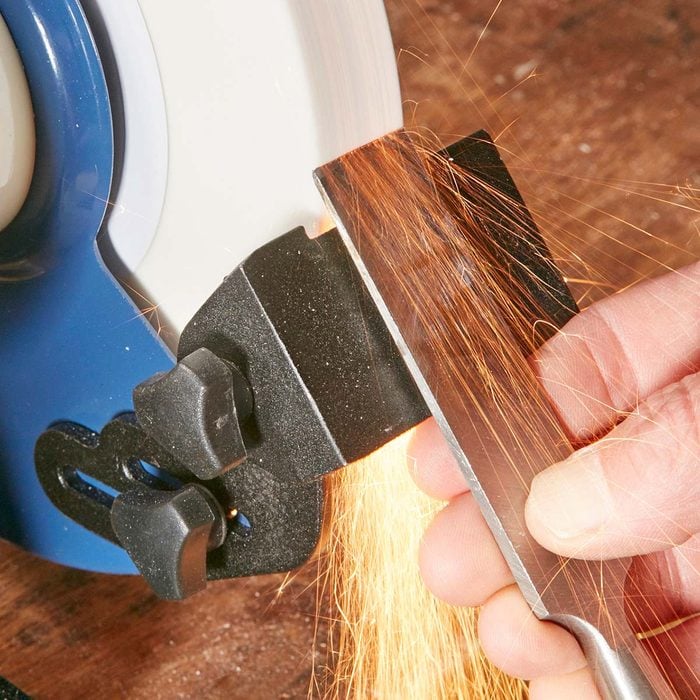
Watch for the Sparks to Come Over the Summit
When you're sharpening a chisel or other tool, y'all tin can tell when the border is getting abrupt by watching the sparks. When the border is blunt, the sparks are deflected downwardly. Just equally the edge gets sharper, the sparks whorl over the tool and cascade downwards the surface facing you. When you see this start to happen, be careful almost grinding much more than because a thin border is very vulnerable to overheating. See more on how to sharpen a chisel.
7 / 15

Make an Bending Gauge
Chisels and other cut tools work best if their edges are basis at the correct angle. You lot tin search online to find the optimal bending for whatever tool you're sharpening. Most forest chisels should be ground to about a 25-caste angle with a secondary micro-bevel bending of thirty degrees on the tip of the blade. An angle gauge allows you to ready the tool rest at the desired angle. Y'all tin can make an angle gauge from a thin piece of cardboard using an inexpensive protractor. 1. Marker THE ANGLE ON CARDBOARD Align the center marker on the protractor with the elevation edge of the paper-thin. Then plough the protractor until the desired angle is also aligned with the top edge. Draw a line along the protractor to mark the bending. Don't forget to label the bending. Cut along the line to create the gauge. 2. ADJUST THE TOOL Remainder Fix the cardboard on the tool rest and adjust the bending of the tool rest until the cycle contacts the center of the angled portion of the cardboard judge. Check out these handy tool tips and tricks.
8 / xv
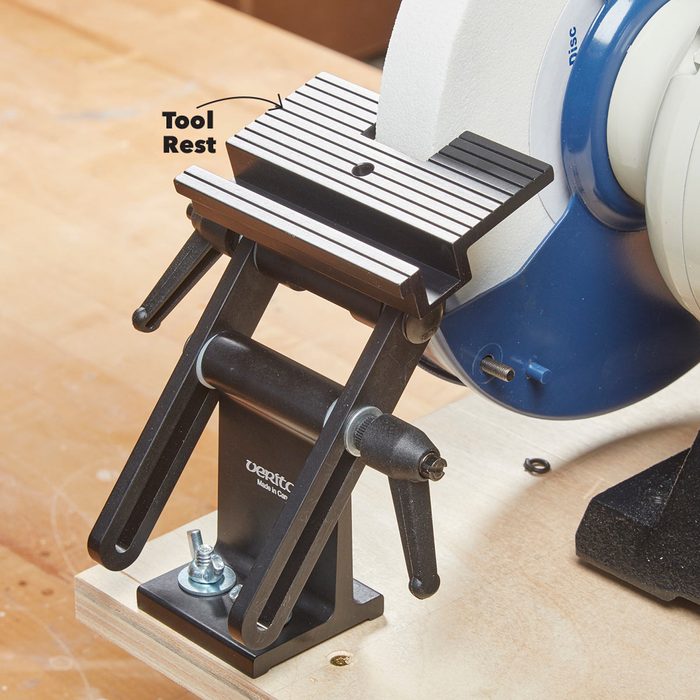
Upgrade the Tool Residue
Inexpensive bench grinders have tool rests that are finicky and hard to adjust. If you do a lot of sharpening or simply want a demote grinder tool remainder that's easier to adjust, consider adding a stand-lonely tool residuum ($lx online or at woodworking stores). There are several variations, some fabricated for specific tasks similar sharpening lathe turning tools. This Veritas model has two adjustments for positioning and aligning the tool rest, and levers for easy tightening. Y'all can also buy an attachment that holds chisels or plane irons. Come across more on how to get the best out of your tools.
nine / 15

Brand Your Grinder Portable
Most dwelling house workshops don't take enough bench space to devote a section to a bench grinder. A expert solution is to mount your grinder to a board or small stand so you can clamp it to the bench when you lot demand it, and store on the shelf when y'all don't. The compartment on this grinder stand is a good spot to keep your dressing tool and safety glasses so they're handy when you demand them. For a fancier version, build a picayune drawer to fit the space under the grinder. The stand is congenital from two 12 ten sixteen-in. pieces of iii/4-in. plywood separated past two 4 10 12-in. uprights. We used two v/16-in. bolts with washers and basics to attach the grinder, leaving plenty space in forepart of the grinder to mount a stand-alone tool residue. Check out these workshop organization tips.
10 / 15
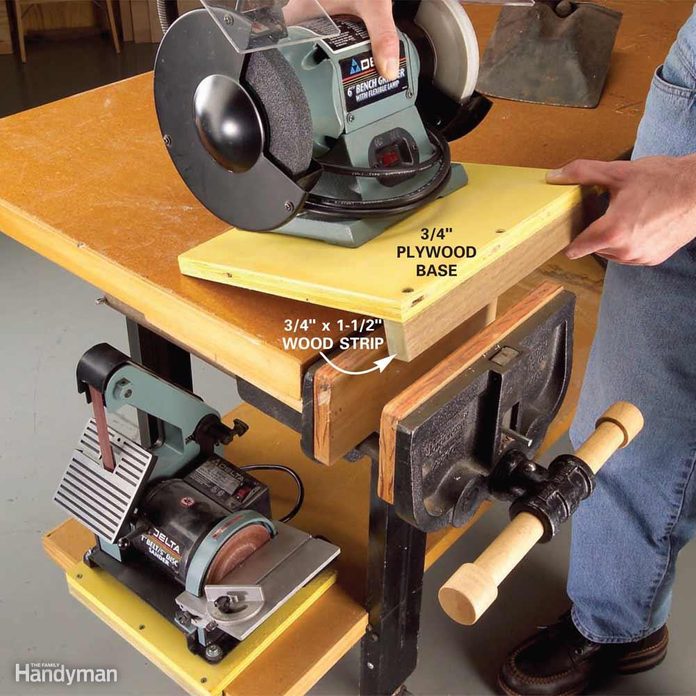
Like shooting fish in a barrel-to-Clamp Mobile Base of operations
Shazam! Fasten your demote-top tools to your workbench in seconds. Bolt 3/4-in. plywood bases on the tools and then glue and spiral a wood strip along the front edge to fit into a woodworking vise. Crank this strip into a vise to lock the tool into identify. If you don't accept a vise, drill a couple of clearance holes along the face of the wood strip on the base and drive screws through the strip into the border of your workbench. And then just unscrew to remove the tool.
11 / 15
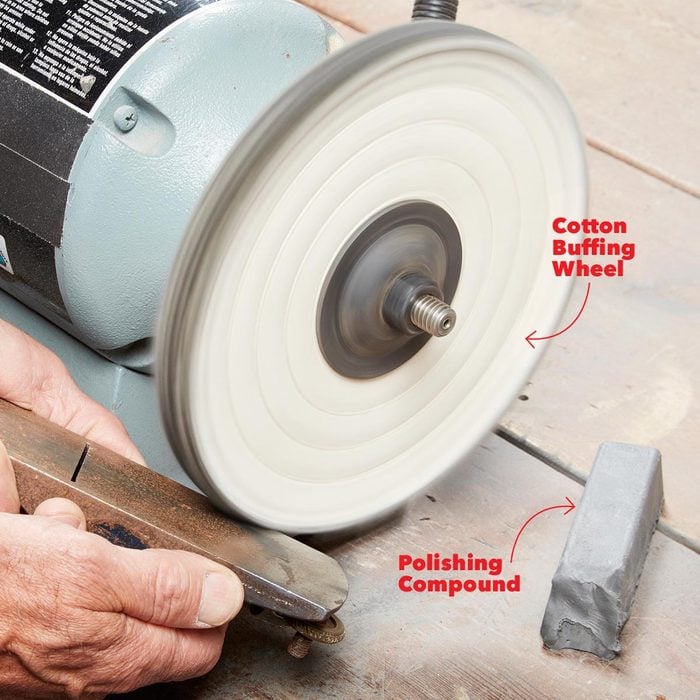
Prepare Up a Polishing Station
A demote grinder fitted with a wire wheel on 1 side and a cotton buffing wheel on the other side, or buffing wheels on both sides, makes a corking cleaning and polishing tool. You lot'll also need a set of polishing compound sticks ($14). Polishing compound sticks are color coded to indicate the dust, from coarse to very fine. To use the polishing wheel, hold the stick confronting the buffing bicycle as it spins to transfer some polishing compound to the wheel. And so hold the object lightly confronting the wheel and let the compound polish the surface. Click here on how to sharpen garden tools.
12 / 15

Sharpen Your Lawn Mower Bract
Grind the tapered cut edges with a grinder only if you encounter nicks in the bract. Follow the manufactory angle of the cutting edge. The grinder volition remove nicks in the bract much faster than y'all can file them. Get the step-by-pace info for this project here.
13 / 15

Grinder Safety
- Habiliment safety spectacles with side shields, goggles or a face shield when grinding.
- Plough the grinder on and stand aside until the wheels come to total speed. If in that location'south a problem, y'all won't be in the path of flying debris.
- Audit grinder wheels for cracks or damage. Before yous install a new wheel, suspend it by a screwdriver through the heart hole. Tap the wheel lightly with the plastic handle of some other screwdriver. The wheel should ring. If you hear a dull thud instead, the bicycle is probably cracked and should non exist used.
- When you install a wheel, don't overtighten the nut. Merely snug it upwards. Overtightening could crevice the wheel.
- Continue the shrouds and spark shields in place. And maintain a 1/8-in. or less gap between the tool rest and the grinding bicycle.
Cheque out these other tool safety tips.
14 / 15

Non All Grinding Wheels are the Same
Yous tin use two kinds of aluminum-oxide wheels to sharpen your chisels; i is blueish-gray and the other white. We used the darker-colour bike, which is harder and will keep its shape longer. The drawback, withal, is that it grinds hotter than the softer, white cycle. Too much estrus will weaken the steel. The soft wheel will need more frequent shaping with a dressing tool, only yous'll be less likely to burn the edge of your chisel while grinding. For best results, use a 100-grit wheel to shape your chisel blades. Learn how to sharpen your chisels like a pro here.
Originally Published: Oct 02, 2022

Source: https://www.familyhandyman.com/list/bench-grinder-basics/
Posted by: daviscound1991.blogspot.com
0 Response to "How Do I Repair A Pencil Style Die Grinder"
Post a Comment